If you’re a Hive user, find out how to use both native and custom project templates to make your project management setup more streamlined.
Hive was founded in 2015 to bring project management and AI together, offering features like automated task management, custom workflows, messaging and collaboration in one platform. Beyond these core features, Hive also offers templates for teams that want to make their projects standardized and repeatable.
Instead of offering hundreds of templates to choose from, Hive reins its templates in and offers only a select few that are fundamental to project management. You’ll find templates for the likes of agile development, client projects, content calendars, complex timelines, new hire onboarding, creative workflows, roadmaps and strategic planning.
SEE: Hiring kit: Project manager (TechRepublic Premium)
If you’re new to Hive, you’ll probably want to begin your journey with a template because it makes getting up to speed with the platform considerably easier. Instead of having to take the time to design a project from scratch, you can simply implement a template and customize it to fit your needs.
In this tutorial, I’ll show you how to use a project template in Hive.
Jump to:
The only things you’ll need to follow along are an active Hive account and a project. This can be a free or paid account, as the templates feature is available for both user groups.
To start, log in to your Hive account. You’ll then need to select or create a new project. One of the quirks of Hive templates is that you can’t create a new project based on a template, as the option is only available through the More menu from within an existing project.
The only exception is any template you create from an existing project will be available from the Projects section, so you can then create a new project based on that template. For pre-built templates, you have to apply them to existing projects.
SEE: How to create a custom field in the Hive project manager (TechRepublic)
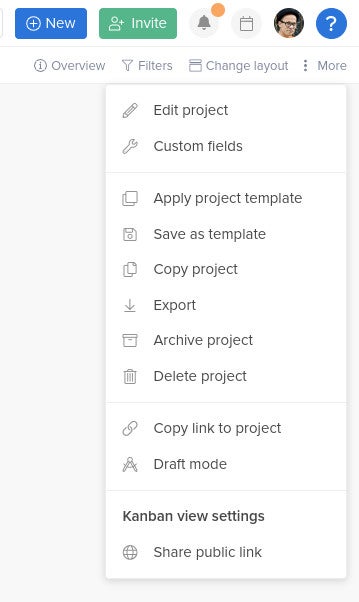
Now, from your project’s default view, click More in the top right corner. From the More drop-down (Figure A), click Apply Project Template.
Figure A

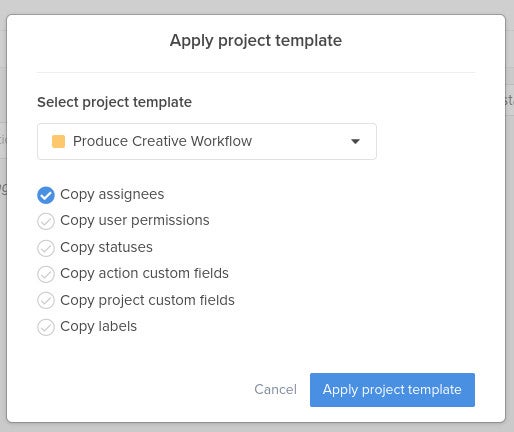
When the Apply Project Template pop-up opens (Figure B), select the template you want to use from the Select Project Template drop-down and click Apply Project Template.
Figure B

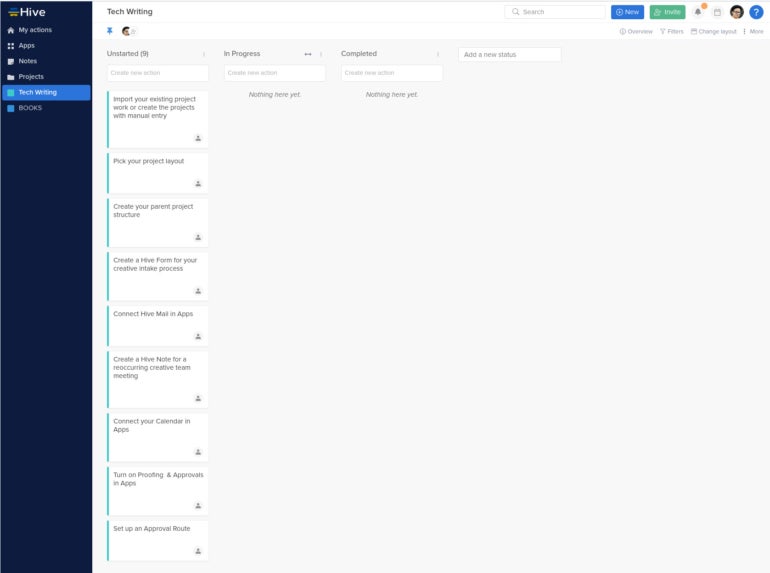
Your new template will immediately be applied to the chosen project. Depending on the template you choose, you’ll find it also populates your board with a number of instructive cards (Figure C) geared toward helping you customize the template.
Figure C

Here’s a handy trick that will save you time later on. Once you’ve applied the new template to your project and have customized it to fit your needs, you can then save that project as a new template before you start adding cards and assigning team members.
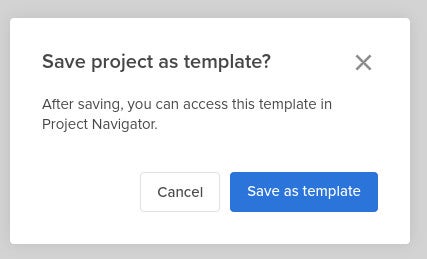
To do this, click More | Save As Template. When prompted, click Save As Template in the resulting pop-up (Figure D).
Figure D

You will not get the chance to name the template, as it will be named after the project from which it was created.
Hive might not offer nearly the number of templates as some other project management platforms, but with the ability to easily use them and create new templates from your custom work, the feature is all you need to add elegant and effective project management to your business.
Read next: The 10 best project management software and tools (TechRepublic)
24World Media does not take any responsibility of the information you see on this page. The content this page contains is from independent third-party content provider. If you have any concerns regarding the content, please free to write us here: contact@24worldmedia.com